Categories


Tech Happens: 12 Tips for Live Streaming with Socialive and Other Tools
Tech happens. Often, another four-letter word is used in place of tech in that phrase, because things can and do go sideways sometimes—especially when you’re doing anything live, be it in person or streaming.
I hate making mistakes myself, but sometimes you don’t know how things will work until you try. And by all means, give live streaming a try, as it’s such a great way to engage with your audience. Plus, most people are pretty forgiving of hiccups during a live stream, because it’s live. It’s real. And it’s scary for (most) people, so there’s a lot of empathy for those who venture forth.
That said, I don’t like to make the same mistake twice, so I keep a handy list of tips I wish I knew before I started and/or have proven very useful.
I’ve used several different tools to live stream, but the one I’m using a lot right now is Socialive, so some of the tips are specific to that tool. However, many of them are relevant no matter what tool you use to stream live. Bonus: the first set will also help for all those Zoom meetings you’re attending.
Overcoming bad Wi-Fi
Nothing can ruin a live stream faster than a bad Internet connection. Ideally, you and your speakers are connecting via a wired ethernet connection. Alas, that’s not an option for many folks these days, so below are some tips for overcoming bad wi-fi that I’ve found have the most impact:
1. Avoid coffee shop-level wireless connections
2. Get as close to your wireless router as possible (you need at least 8MBps upload speed)
3. Restart your computer before the chat
4. Close all nonessential software and browser tabs (make sure to quit, not just close, applications like Skype, Zoom, and Teams, otherwise they run in the background)
For more troubleshooting tips, read “Bad Wifi is slowing you down. Fix yours without spending a dime.”
Platform-agnostic tips
5. Wait 10 minutes between back-to-back live streams to X (Twitter)/Periscope
Periscope needs time to render a stream for replay once it’s done. If you start streaming again before the replay is displaying on X and Periscope, your next video will be added to the first one, with no new post going out on X. I find it best to wait until I see the rendered video on X before I start the next one. The good news, waiting between streams is better for your audience anyway.
6. Include an end card when streaming to LinkedIn
There’s roughly a 10 – 15-second delay between what’s happening in your streaming tool and what’s seen on LinkedIn; and LinkedIn is notorious for ending streams prematurely when you stop them in the tool. If you add an end card and let that stream for a few seconds before ending the stream, that gives you a buffer. You can always edit out the extra second in the final recording.
7. Have the channel you’re streaming to open on a second device
This is a good practice just to make sure everything looks and sounds good to your audience. Although if you’re in the live stream yourself, then you want to be mindful of the sound.
Socialive-specific tips
This final set of tips are Socialive specific.
8. Understand the purpose of the Socialive timeline
Think of the elements in your timeline like acts in a play, and you want at least three acts:
- Intro slide or video: if you’re using an intro video, make sure to read #9 below
- Live camera (your speakers):
- No matter how many speakers you have, only one of them should be in the timeline (unless, of course, you have multiple acts with different speakers)
- The speaker you want on the far left (or top left, or top center, if only two) is the person you want in your timeline
- The other speakers you’ll drag from your sources list to the open spots in the layout preview
- End card: see #6 above for one reason why this is a good practice
9. Be mindful of streaming recorded videos of any kind
If you’re streaming a video as an intro or during your broadcast or you’re streaming a pre-recorded video for the entire stream, make note that when the video ends, Socialive automatically moves to the next element in your timeline or stops the stream if there’s nothing else in the timeline.
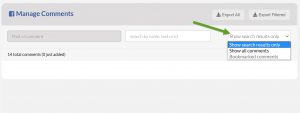
10. Select “Show all comments” to see Facebook comments in Socialive
By default, the Facebook “Manage Comments” tool displays “Show search results only,” which will show that you have comments (14 in the example below) but not what the comments are. Click the drop down and select “Show all comments” so you can see and respond to Facebook comments from within Socialive (second image below).

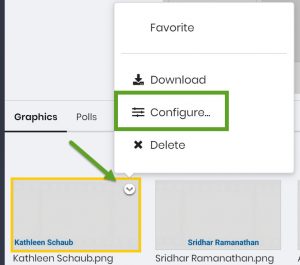
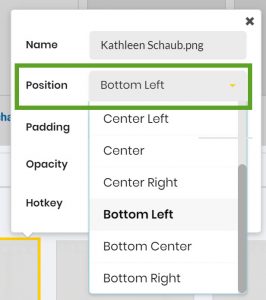
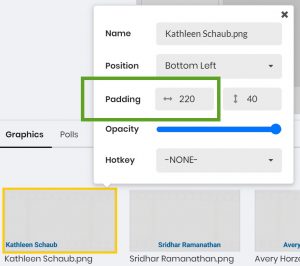
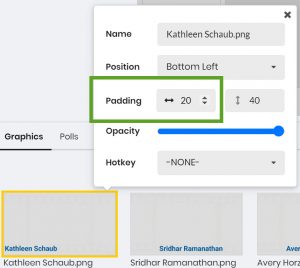
11. Use padding to place name badges where you want them
The default placement for graphics is bottom, center, and right; center left, center, and right; and top left, center, and right; so if you chose a layout that doesn’t align with those placements, your name graphics won’t line up with the speakers’ faces. You can make them align using the padding field under configuration. Simply click on the graphic you want to place, click the down arrow for that graphic, select “Configure” and “Position,” and then adjust the padding accordingly as shown below.
12. Be mindful of your NON-options
A lot of microphones work with Socialive, but alas, the Rode Podcaster isn’t one of them—at least it wasn’t the last couple of times I tried it. So make sure to test your microphone before going live for the first time by simply doing a recording to your internal Socialive account. You can also see a list of equipment that Socialive recommends at “Microphone, Camera, and Hardware Recommendations.”
The other thing to be aware of is that green screens aren’t currently an option with Socialive, so consider what’s in your background before going live. You can always use backdrops if the area you’re streaming from isn’t suitable for public viewing.
If you’re looking for some general video tips for non-videographers on lighting, equipment, and more, check out the two posts below and also follow Timo Elliott, as he’s used his time sheltering in place to really up his virtual presenting game, and he regularly shares what he’s learned:
- Tips for Getting Started with Social Media Video: The Equipment
- Tips for Getting Started with Social Media Video: Execution
Meanwhile, if you have any tips that you find useful, please share!